Discovering Stable Diffusion: How I Created an Epic Portrait with Just a Web Browser and Good Imagination
A Step-by-Step Guide for Improving Your Portrait Skills with Stable Diffusion

As an avid admirer of good art, I’ve always wanted to learn how to draw portraits that truly captured the essence of who I am. But as someone who doesn’t consider themselves particularly talented at drawing, I was skeptical that I could ever achieve the level of realism and detail that I desired. That is, until I discovered Stable Diffusion.
In this post, I’ll be sharing my journey of how I gradually improved my portrait skills using stable diffusion, a powerful tool that allows you to generate high-quality portraits with just a web browser and a good imagination. I’ll also be providing step-by-step instructions and examples to show you how you can do the same, even if you don’t have any coding skills. So if you’ve ever wanted to create beautiful and realistic portraits that showcase your unique identity, keep reading!
1. Starting with a Simple Prompt
The first step to creating a portrait using stable diffusion is to write a prompt, which is a description of the portrait you want to generate. My initial prompt was simply this:
a portrait of a man
While the resulting portrait was nice, it was a random man that didn’t really resemble me in any way. These were the four images :

2. Refining the Prompt to Resemble My Physical Attributes
To make the portrait more realistic and closer to my physical attributes, I added more details to the prompt. For example, I wrote:
a portrait of a young Indian man in his early 30s
I also added:
wearing glasses
since I do wear glasses in real life.
The resulting portraits generated were already an improvement over the initial prompt. The first one on the second row even resembles some of my facial features.

3. Googling Examples of Good Prompts for Stable Diffusion to add artistic effects
While the portrait was starting to have a few features that were similar to mine, it was still a far cry from what I wanted. It was too much of a real face, while I was looking for more of an artistic rendition. To make it look even more impressive, I Googled examples of good prompts for Stable Diffusion. I found helpful examples on websites such as webpost.io and prompthero, and modified my prompt. Some examples of the additional details I included were:
- The style of the portrait (e.g. “by Dustin Nguyen, Akihiko Yoshida, Greg Tocchini, Greg Rutkowski, Cliff Chiang”)
- The resolution (e.g. “4k”)
- Inspirations for the portrait (e.g. “Dishonored inspired, bravely default inspired”)
- The composition of the portrait (e.g. “epic extreme long shot, dark mood and strong backlighting”)
- Special effects (e.g. “volumetric lights, smoke volutes”)
- Engine examples for generating the portrait (e.g. “ unreal engine, octane renderer”)
This was the resulting prompt:
a portrait of a young Indian man in his early 30s wearing glasses, by Dustin Nguyen, Akihiko Yoshida, Greg Tocchini, Greg Rutkowski, Cliff Chiang, Dishonored inspired, bravely default inspired, epic extreme long shot, dark mood and strong backlighting, volumetric lights, smoke volutes, unreal engine, octane renderer, 8K render

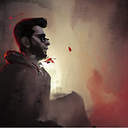
4. Adding final touches: The Black & White
I finally decided to make the portrait black and white, and add red highlights.
Here’s the final prompt I ended up with:
a portrait of a young Indian man in his early 30s wearing glasses, by Dustin Nguyen, Akihiko Yoshida, Greg Tocchini, Greg Rutkowski, Cliff Chiang, Dishonored inspired, bravely default inspired, vibrant but dreary red, black and white color scheme, epic extreme long shot, dark mood and strong backlighting, volumetric lights, smoke volutes, unreal engine, octane renderer, 8K render

Tips for Writing Effective Prompts for Stable Diffusion
Now that you’ve seen my journey of how I gradually improved my portrait using stable diffusion, you might be wondering how you can do the same. Here are some tips for writing effective prompts that will help you create high-quality portraits:
- Be specific: The more details you include in your prompt, the more realistic and personalized your portrait will be. Think about things like the person’s physical attributes, clothing, background, and any other specific details that you want to include.
- Experiment with different styles: Stable diffusion allows you to generate portraits in a variety of styles, so don’t be afraid to experiment and see what works best for you. You can try different artists, resolutions, and color schemes to see what gives you the best results.
- Use inspiration as a starting point: If you have a particular artist or artwork that you admire, use it as inspiration for your prompt. You can include details about the artist’s style or the overall mood and aesthetic of the artwork in your prompt.
- Don’t be afraid to get creative: Stable diffusion is a powerful tool that can generate portraits with a wide range of details and effects. Don’t be afraid to get creative and see what you can come up with!
By following the steps outlined in this post, you can use stable diffusion to create beautiful and realistic portraits that capture your unique identity. Whether you’re a seasoned artist or just starting out, stable diffusion is a powerful tool that can help you improve your portrait skills and create stunning works of art. So don’t be afraid to give it a try and see what you can create!